My Outside Digipak Panels

My Inside Digipak Panels

Please click the image below to view our finished website

Thursday 30 March 2017
This blog is now closed
My work for this project is now complete. I hope you enjoy my blog and thank you.
Thursday 16 March 2017
Question 1: In what ways does your media product use, develop or challenge forms and conventions of real media products?
The opening to my film 'Shadow of your Past' both conforms to and challenges the conventions of real film openings and the genre of crime thriller. It does this in numerous ways, for example typical characters and their behaviour, editing techniques, titles and the overall style of the opening.
'Shadow of your Past' is about a female lawyer, Shania, who, after a rapist she helped prosecute is released from prison, finds herself the target of his rage as he plots revenge against her. The film goes on to focus on Shania as her life starts to unravel with the rapist stalking her, leaving her gifts and eventually reaching his end goal of kidnapping her. After a failed attempt to escape by herself, Shania is later found by the police and taken to safety but the rapist manages to get away. The film ends, therefore, on a slight cliffhanger with Shania attempting to get her life back on track and with the audience left wondering where the rapist has gone and if he'll ever return to Shania's life.
Form
How our film opening conformed to conventions
Please click to enlarge the table below for my answers.

Genre
Below is a mind map on the conventions of thriller films. Those highlighted in a different colour are the ones that we have included in our film opening.
Please click and drag to navigate.
Conventional Characters
Narrative Structure
Below is a Prezi explaining Todorov's Narrative Theory and how it relates to our film.
Other narrative techniques and conventions we used in our opening include:
- Levi Straus' Binary Opposites
- Law vs Crime
- Woman vs Man
- Calm setting vs unsettling event of stalking
- Smooth camera movement on Shania vs shaky, hand-held POV stalker shots
- Propp's Character Theory
- This theory states that there are key characters with set functions in every storyline
- We wanted to challenge this slightly to have a female lead who whilst technically a Victim/damsel in distress, she is still the hero in some respect as she keeps herself alive when kidnapped through her own intelligence and skill, and attempts to save herself without relying on anyone else, particularly a man, to do it for her.
Style
1. Soundtrack
Our opening has two soundtracks which work together to initially create a slightly eerie and unsettling atmosphere with simple classical piano - similar instrumentally to the very beginning of Taken and a similar vibe to the opening of Gone Girl - and then to build tension and match the drama of the red herring sequence, switching to the more 'aggressive' track that gives a more action/thriller atmosphere than the beginning.
2. Grading
Grading was very important to us as we wanted to create a naturalistic, un-glossed look to the opening that is normally seen in British Indies and BBC drama productions. This desaturated, gloomy look also reflects the genre and is similar to the grading seen in Gone Girl and Se7en.
 |
| Graded shot from our opening |
 |
| Graded shot from Gone Girl |
 |
| Shot from the sixth film |
 |
| Shot from the first film |
3. Titles
The wording and order of our titles was inspired by Se7en as previously discussed but it, along with Shutter Island also inspired the unsettling effect we chose for our titles.
The disconcerting shaking effect helps to connote the genre and meets audiences' expectations of opening credits for a crime thriller film.
We chose a simple white font for all of our titles so as not to distract from the action, especially as they are superimposed.
For the actual film title we used a different font to ensure that it stood out and it was inspired by the font seen on the poster for Shutter Island.
 |
| Our film title |

On the whole, I think that our film opening does conform to genre and structural conventions with the only challenges coming from characterisation, as we wanted to represent a social group often neglected in film.
Question 2: How does your media product represent particular social groups?
The main social group that we chose to represent in our film is black females as they are severely underrepresented, often negatively portrayed or are there for tokenism. We created our desired representation through camera work, casting, costuming and mise-en-scene.
Statistics of females in films show that they are very underrepresented and that last year audiences were twice as likely to see male characters as they were female. The breakdown of percentage of female characters of colour showed an increase from 13% to 14% for black women from 2015 to 2016 and only 5% of females were portrayed as leaders.
Typical roles of women in films
Representation of black women in film


Our representation
We wanted to create a strong black female lead who could act as a positive role model and who actually represented aspects of 'real' women, instead of traditional stereotypes that only focus on one or two characteristics.
The characteristics we wanted to highlight in Shania are:
We chose this representation because we wanted to create a role model for young girls that they could relate to and be inspired by. Even when faced with a horrific and traumatic event, Shania manages to pull through, stay true to herself and prove her worth as an individual, which is the positive representation and message we wanted to give to our audience.
Representation of Women
Statistics of females in films show that they are very underrepresented and that last year audiences were twice as likely to see male characters as they were female. The breakdown of percentage of female characters of colour showed an increase from 13% to 14% for black women from 2015 to 2016 and only 5% of females were portrayed as leaders.
 |
| Percentages of males, females and ensembles as protagonist - 2016 |
For the full report please click the link - It's a Mans World Report
Whilst women's roles have evolved from the traditional 'Princess' or 'Damsel in Distress' to include Hero and Villain for example, they often still conform to unflattering stereotypes that are so prevalent in film that we often don't even realise that they can be damaging to young girls' views of themselves.
Typical roles of women in films
 |
| A collage of conventional female characters |
Representation of black women in film
Although these stereotypes are prevalent in TV and film, there are some characters that are more innovative and are a step in the right direction as they take some of these stereotypical traits and add other characteristics that make the portrayals more representative of black women in the real world. TV tends to be better at doing this than film and examples include:
Sasha and Michonne from The Walking Dead


and Jessica from Suits

Our representation
We wanted to create a strong black female lead who could act as a positive role model and who actually represented aspects of 'real' women, instead of traditional stereotypes that only focus on one or two characteristics.
The characteristics we wanted to highlight in Shania are:
- Independent
- Intelligent
- Hard working
- Strong
- Driven
- Determined
- Out-spoken
- Supportive
We created this representation through our characterisation and in particular our mise-en-scene. The costuming played a large part in this and coupled with the legal documents Shania signs, connotes her professionalism and drive, as she works in a notoriously hard field to excel in. Her smart black and white dress connotes the sophistication we wanted to portray and, coupled with the affluent neighbourhood she lives in and the set dressing to give a feminine yet minimalistic look, highlights her organisation and success. These aspects were very important for us to pick out as we wanted the audience to not only be able to relate to Shania, but also to see her as a role model with inspirational qualities, moving beyond the traditional gender and ethnicity stereotypes discussed above.
These traits are similar to those seen in Katherine Johnson, Dorothy Vaughan and Mary Jackson from Hidden Figures and Annalise Keaton from How to Get Away with Murder, who was our main inspiration for Shania as described in the research and planning posts.
Below is a clip of Keaton in court (the same professions as our own main character) highlighting some of these personality traits.
We chose this representation because we wanted to create a role model for young girls that they could relate to and be inspired by. Even when faced with a horrific and traumatic event, Shania manages to pull through, stay true to herself and prove her worth as an individual, which is the positive representation and message we wanted to give to our audience.
Question 3: What kind of media institution might distribute your media product and why?

Below is a table of BBC productions that inspired us and prove that BBC could produce our own film. Please click to enlarge.

Production Budget
As a small British Independent film, that requires no expensive CGI or visual effects and is filmed mainly on location, a small budget would be appropriate.
We loosely based our budget figure off of the BBC Films 2011 production 'We Need To Talk About Kevin', which had a budget of $7,000,000. I think that as we want more global appeal and recognition as well as London being the setting, a slightly higher budget of approximately $10,000,000 would be appropriate.
Distributor
We chose Summit Entertainment, a subsidiary company of Lionsgate, as the distributor to buy the rights to 'Shadow of your Past' as they have global reach and have distributed similar films in the past, such as 'P2'.
Question 4: Who would be the audience for your media product?
Our media product has a range of possible audience. The primary audience consists of fans of the crime thriller genre and both genders.

It's important to have a clear idea of your target audience to ensure that you can tailor your film idea to them and ensure that it is appealing.
Thriller is a big genre with multiple sub-genres and vast range of storylines and after action thriller, crime thrillers are one of the most common crossovers.
Below is a table showing the number of releases per genre and the box office takings of the genres that did the best in 2015.
 |
| Table for the BFI Statistical Yearbook |

It's important to have a clear idea of your target audience to ensure that you can tailor your film idea to them and ensure that it is appealing.
Question 5: How did you attract/address your audience?
We attracted our audience by using genre conventions, age appropriate themes and content and the uses and gratification theory.
Below is a mind map detailing how we specifically addressed our audience.
Please click the present button in the top right hand corner to make the mind map full screen for ease of navigation.
Here is an extract from some quantitative audience feedback data that I collected.
Conclusions from feedback, with my own response to it in blue.
Below is a mind map detailing how we specifically addressed our audience.
Please click the present button in the top right hand corner to make the mind map full screen for ease of navigation.
Audience Feedback
We showed our film opening to a range of people in our TA of both genders and ages ranging from 15-50. Below are videos from two of the groups, showing their reaction.
Here is an extract from some quantitative audience feedback data that I collected.
 |
| Audience feedback |
Conclusions from feedback, with my own response to it in blue.
- On the whole, our opening was clear and people could understand what was going on
- I was very pleased with this as it shows that an audiece are able to follow what is happening in our opening which is the starting point to ensuring that the audiences' needs are met.
- The hand held running shots were popular with everyone that we asked
- Again, I was really pleased with this response as those shots were verey hard to film but my group and I pushed to do them becuase we thought that, not only were they visually interesting, but they also helped to immerse the audience in the action and aid escapism.
- The majority of people liked the lack of dialogue as it added to the mystery of what was happening but some did feel like more would have been better or a bigger deal should have been made of the dialogue that was included
- I agree that a bigger deal should have been made of the two lines of dialogue that we did include, but I liked the lack of speaking, not only because it reduced the chance of possible bad delieveries from the actor that could take the audience out of the moment, but also becuase I believe that it adds to the mystery of the sequence and tension building.
- The stalker shots through the window could have been made more obvious - suggestions included fading the edges out of the hots or superimposing a camera viewfinder over the shots
- These suggestions are something that if we had the chance to redo this project I would definitely consider because whilst I think that our idea was good with these stalker shots, in my opinion, they fall a bit flat. Making it more obvious that it's a stalker by superimposing a camera viewfinder could have better built tensions and suspense, in turn meeting the audience's needs for escapism and to be entertained.
- The varied framing and angles of the shots were visually interesting
- This feedback was really pleasing because during pre-production my group and I spent a lot of time planning out our shots to be varied to ensure that our sequence didn't look ploddy and boring.
Question 6: What have you learnt about technologies from the process of constructing this product?
This project has allowed me to expand on my prior knowledge of the technologies used and learn about completely new ones, increasing my confidence and ability to use the equipment. The main thing that I have learnt is that the more practice you get with the technology and the more you know what you're doing, the smoother the project will run and easier it will be.
Below is a Prezi detailing what I have learnt throughout this process in terms of technology.
Below is a Prezi detailing what I have learnt throughout this process in terms of technology.
Question 7: Looking back at your preliminary task, what do you feel you have learnt in the progression from it to the full product?
I think that my knowledge and skills have greatly improved since the prelim task and that can be seen in the increase in quality of my work from it to the actual brief.

To achieve the continuity specified in both briefs we had to include:

Match on action in the Prelim
Match on action in the film opening
The match on action for the opening was smoother than the one in the prelim and was a lot more visually interesting with the pan and varying angles.
Differences
In the main shoot we got to experiment with more challenging and interesting shots for example the hand held runner and stalker POV shots seen below.
We also took a lot more takes for the main task as the shots were generally more tricky needing greater accuracy and detail.
The Briefs

Below is our prelim task
To achieve the continuity specified in both briefs we had to include:
- Match on actions
- The 180 degree rule
- Shot reverse shot
Pre-Production
The pre-production for the prelim was very different to the process for the actual brief. Some of the differences are detailed below.

The main difference was that for the actual brief we went into a lot more detail in the planning stage as we found in the prelim that if you only had a rough idea of something it was very hard to get a good shot to represent that idea and time would be wasted.
Production
Whilst there was cross over in the basics of each task - we used the same standard principles of continuity - the production for each was very different. The prelim was a lot shorter and took a lot less time than the actual brief.
Below is an example of the similarities between the two shoots.
Match on action in the Prelim
Match on action in the film opening
The match on action for the opening was smoother than the one in the prelim and was a lot more visually interesting with the pan and varying angles.
Differences
In the main shoot we got to experiment with more challenging and interesting shots for example the hand held runner and stalker POV shots seen below.
We also took a lot more takes for the main task as the shots were generally more tricky needing greater accuracy and detail.
Post Production
Although we used the same software in both cases to edit, for the main task we got to use more complicated tools, such as Constant Gain for smoother audio transitions and the zoom keyframes, as well as having a lot more time to 'perfect' our edits. We were also not required to grade our shots for the prelim where as for the main task it was a very important part of the post production process.
From the prelim I learnt that:
- Naming your rushes was important for ease of sorting out the timeline on Premiere
- Edit on alternate tracks to make everything easier to see
- Roughly cut the shots down first and then when they are on the timeline do the fine editing
Conclusion
From the prelim to the main task, I have showed a huge increase in skill in using the equipment and software as well as confidence in my ability to create a media product that meets the conventions of real life examples. I have enjoyed this project so much, even though at times it was stressful and am so proud of myself, the rest of my group, our learning curve and our final product of the film opening for 'Shadow of your Past'.
Sunday 12 March 2017
Construction Post 30: Looking back - reflections on our final outcome
Here is our final film opening
Below is a video of Meera and I reflecting on our final film opening.
Overall, I am really happy with the final outcome because even though there are still obviously some things that we would change, as discussed in the video, the improvement from the test shoot and edit was huge and I genuinely like what we have created.
Construction Post 29: My technical learning curve
Throughout this project I have learnt so much from pre-production all the way through to post-production.
Although I had used all of the equipment and software, with the exception of the lighting kit, before at GCSE, this time around I had a lot more freedom to try different, harder and more creative tools and techniques.
During production I got to shoot a series of hand held shots which I really enjoyed doing. They were challenging to get right because the movement had to still be smooth and it too a few takes for me to get used to lining the shot up so that it wasn't at a canted angle.
Below is an example of a hand held shot that took a few tries to get right and so that it wasn't really canted.
As I had already used Adobe Premiere before, I knew my way around the software and the basic editing tools that we would be using. During our main edit though I got to use more advanced tools and overall do more complicated editing. For example I added in a zoom during post-production using key frames and then re positioning the footage in the frame, to make the text clearer.
Although I had used all of the equipment and software, with the exception of the lighting kit, before at GCSE, this time around I had a lot more freedom to try different, harder and more creative tools and techniques.
 |
| Me on camera |
During production I got to shoot a series of hand held shots which I really enjoyed doing. They were challenging to get right because the movement had to still be smooth and it too a few takes for me to get used to lining the shot up so that it wasn't at a canted angle.
Below is an example of a hand held shot that took a few tries to get right and so that it wasn't really canted.
As I had already used Adobe Premiere before, I knew my way around the software and the basic editing tools that we would be using. During our main edit though I got to use more advanced tools and overall do more complicated editing. For example I added in a zoom during post-production using key frames and then re positioning the footage in the frame, to make the text clearer.
 |
| Me adding in the keyframes for the zoom |
I also learnt how to use the constant gain tool. It is placed between two sections of audio and makes the transition between the two shots' audio smoother and less jarring. This was particularly useful for the transitions between the outside stalker shots and the inside kitchen shots for example.
 |
| Close up of the constant gain tool |
 |
| Me adding in the constant gain tool |
Construction Post 28: My personal contribution to the Edit Sessions
 |
| Me editing a match on action |
During the second week, with the back-up footage needing to be put in as well as all of the grading and titles needing to be done, there was a lot more overall to do.
I did some of the grading for the kitchen shots to give them the 'look' we were after and a video showing the grading changes can be seen below.
Also during the second week of editing, we noticed that there was a problem with one of our shots. It was an over the shoulder pan down to a text that the main character gets which despite looking clear when we played it back on the camera, was too hard to read when transferred to the computer. After talking to the technician, we decided that the only way to improve this was to add in a zoom on Premiere. I was the one to do this in my free period following the discussion and was pleased that the rest of the group and the teachers were happy with the improvement when they saw it.
I also created some of the titles for the opening on LiveType, adding in the effects and attributes to give the look we were after.
Below is a video of me creating a title.
Construction Post 27: My Personal Contribution to the Shoot Sessions
During the shoots I filled a variety of roles and had a go at doing everything for myself, from directing, being on sound, dressing the sets and actually operating the camera.
As we were shooting at my house, I did the majority of set dressing the night before we would be shooting to save time so that on the day we just had to add the final touches to get the rooms ready to be shot in.
Whilst filming we realised that out of the three of us in the group I had the steadiest hand and so for the hand held shots in the street and those that had very complicated movement such as the one in the bedroom following Shania to the mirror, I took the lead. These shots were very hard to film as they needed to be as smooth as possible to ensure our opening looked clean and professional. Although challenging, I really enjoyed getting to do the hand held shots myself and it was one of my favourite parts of the whole process.
In addition, because I was the one on camera for these shots, I got to be really creative with the camera movement in the harder shots, making adjustments from our original planned idea if it wasn't quite working. A prime example of this was the bedroom mirror shot which due to the tight angles didn't originally go exactly as we planned, but with some experimenting, I found the best way to do it as close to the original idea as possible, whilst still keeping everything smooth and professional.
The runner's POV shots were also really fun to film, despite the fact that to stop it from being too shaky I had to run in a fairly weird way but I think, watching it back, they came out quite well.
I also took charge of one of the lights we were using for the stalker shots through the window. As the lights can get extremely hot I had to stay with it to switch it off quickly between each take so that the bulb didn't blow and no one got hurt. I had never used a three point lighting system before and so enjoyed getting to see how it all worked during filming.
For me, the shoots were so much fun and I honestly enjoyed everything that I did.
As we were shooting at my house, I did the majority of set dressing the night before we would be shooting to save time so that on the day we just had to add the final touches to get the rooms ready to be shot in.
 |
| Bed side table dressed for shoot |
 |
| Kitchen counter dressed for shoot |
Whilst filming we realised that out of the three of us in the group I had the steadiest hand and so for the hand held shots in the street and those that had very complicated movement such as the one in the bedroom following Shania to the mirror, I took the lead. These shots were very hard to film as they needed to be as smooth as possible to ensure our opening looked clean and professional. Although challenging, I really enjoyed getting to do the hand held shots myself and it was one of my favourite parts of the whole process.
 |
| Me framing a hand held in the house |
 |
| Me framing a hand held shot in the road |
In addition, because I was the one on camera for these shots, I got to be really creative with the camera movement in the harder shots, making adjustments from our original planned idea if it wasn't quite working. A prime example of this was the bedroom mirror shot which due to the tight angles didn't originally go exactly as we planned, but with some experimenting, I found the best way to do it as close to the original idea as possible, whilst still keeping everything smooth and professional.
The runner's POV shots were also really fun to film, despite the fact that to stop it from being too shaky I had to run in a fairly weird way but I think, watching it back, they came out quite well.
I also took charge of one of the lights we were using for the stalker shots through the window. As the lights can get extremely hot I had to stay with it to switch it off quickly between each take so that the bulb didn't blow and no one got hurt. I had never used a three point lighting system before and so enjoyed getting to see how it all worked during filming.
 |
| Our group putting up the lighting system |
For me, the shoots were so much fun and I honestly enjoyed everything that I did.
Construction Post 26: Reflections on Edit Week 2
Our focus for the second week of editing was first putting in the footage from the back-up shoot followed by grading, titles and any small finishing touches.
Below is our schedule for Edit Week 2.

When it came to grading our shots we wanted to make everything have a more blue/grey feel to it, inspired by Gone Girl as discussed in my research and planning posts. Grading was particularly important for the kitchen shots as when the lights were on they gave a very orange look which went against the low-key lit, somber atmosphere we wanted to create to fit the genre.
To grade our shots and create the look seen above, we used:
Below is our schedule for Edit Week 2.

When it came to grading our shots we wanted to make everything have a more blue/grey feel to it, inspired by Gone Girl as discussed in my research and planning posts. Grading was particularly important for the kitchen shots as when the lights were on they gave a very orange look which went against the low-key lit, somber atmosphere we wanted to create to fit the genre.
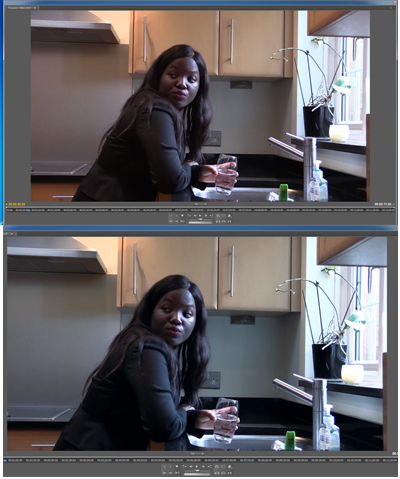 |
| Grading example: before (top) after (bottom) |
To grade our shots and create the look seen above, we used:
- Three-Way Colour Corrector
- ProcAmp
- Levels
We also had to create the titles and credits using LiveType on the MacBook. Our inspiration for them was Se7en and Shutter Island as previously discussed in research and planning. To create our desired unsettling look we used an effect called 'Stagger' in the Grunge category for all of the credits except the title, for which we used the 'Drop In' effect.
Construction Post 25: The Back-Up Shoot
Our back-up shoot was on the 5th March and we started at 9:00am as usual and finished at around 2:30pm.
Below are the shootboard pages for the back-up shoot. Please click to enlarge.


Unfortunately it was raining that morning and was forecast to do so for the rest of the day so we had to change our plans slightly. When the rain started to lighten up, we started straight away on the outside shots, incorporating an umbrella into the planned shots. We got through two shots before the weather completely changed - the rain stopped and the sun started to come out.
We then re-did the shots that we had put an umbrella in and carried on with the others as we had originally planned.
Whilst shooting the red herring sequence, to ensure that we didn't make the same mistakes as last time, we kept a close eye on the distances between the runner and Shania. We also practised the hand held runner POV shots a lot more to try and ensure that whilst they were still shaky, they were still steady enough that they weren't too jolting and hard to follow like they were in the main shoot.
We also added a small amount of dialogue into this sequence as Shania was on the phone. She first says 'Yeah I'm alright, I just can't believe that he has been released' and after the runner bumps into her 'I'm alright, it's just a jogger'. I feel that this really added to the scene as it highlighted Shania's worry over the release of the rapist she prosecuted and made the final shot of the stalker watching the entire exchange even creepier.
To set up the phone call for outside and to really make clear to the audience that Shania was involved in the stalkers previous conviction and was worried about his release, we had a text come through on her phone from a friend saying that she had heard about the release and wondered if Shania was ok.
Below are the shootboard pages for the back-up shoot. Please click to enlarge.


 |
| Picture showing the change in weather to sunny |
We then re-did the shots that we had put an umbrella in and carried on with the others as we had originally planned.
Whilst shooting the red herring sequence, to ensure that we didn't make the same mistakes as last time, we kept a close eye on the distances between the runner and Shania. We also practised the hand held runner POV shots a lot more to try and ensure that whilst they were still shaky, they were still steady enough that they weren't too jolting and hard to follow like they were in the main shoot.
We also added a small amount of dialogue into this sequence as Shania was on the phone. She first says 'Yeah I'm alright, I just can't believe that he has been released' and after the runner bumps into her 'I'm alright, it's just a jogger'. I feel that this really added to the scene as it highlighted Shania's worry over the release of the rapist she prosecuted and made the final shot of the stalker watching the entire exchange even creepier.
To set up the phone call for outside and to really make clear to the audience that Shania was involved in the stalkers previous conviction and was worried about his release, we had a text come through on her phone from a friend saying that she had heard about the release and wondered if Shania was ok.
 |
| Screenshot of the text being received |
Overall, I'm very pleased with the footage we got in the back-up shoot and believe that it will ensure that our opening is a lot clearer to the audience and builds a lot more tension throughout.
Construction Post 24: Reflections on Edit Week 1
During the first week of editing, our priority was to get all of the footage down onto the timeline, along with the soundtrack, and edited together as tightly as possible to see whether a back-up shoot was necessary.

Below is our edit week 1 schedule

As a group we decided that we would need to do a back-up shoot very early on during the week due to some obvious errors that we saw, such as the lighting kit being seen in one of the shots and the lipstick on the glass. The red herring sequence was another reason because, as well as the differences in the distances between the runner and main character from shot to shot not being realistic, the shot that had both characters' feet in ruined the suspense that we were trying to create as the audience found out too early that the person following Shania wasn't the stalker.
 |
| Group editing session |
After having a group discussion and getting our teachers' opinions, we decided that to make our red herring sequence work we needed to keep the mystery of who was fallowing Shania a secret for longer than what we had originally planned. We also needed to think of a way to have Shania be more unaware of her surroundings as otherwise, in reality, she would hear the footsteps way before the runner had the chance to bump into her.
To fix these issues we decided to have Shania on the phone as this would realistically make her unaware of her surroundings and help add to the tension as the audience knows more than she does. We also included two POV shots from the runner's perspective to make it seem more like the stalker was the one running after Shania. We also tightened our framing up for the bump so it wasn't until the wide that the audience find out that it was just a harmless runner coming up behind Shania rather than the stalker.
Aside from the issues we picked up on during the edit, I was very happy with how it was all going at the end of week one, as we had a clear plan of exactly what we were keeping and what needed to be redone. We were also a lot closer to the time our opening was supposed to be, even with the issues in the end sequence.
Aside from the issues we picked up on during the edit, I was very happy with how it was all going at the end of week one, as we had a clear plan of exactly what we were keeping and what needed to be redone. We were also a lot closer to the time our opening was supposed to be, even with the issues in the end sequence.
Construction Post 23: Our Post-production Kit
For post-production, our editing hardware consisted of:
The software consisted of:
The editing was all carried out on Premiere, with the exception of the titles which we created on LiveType, as it gave us a wide range of different fonts and effects to choose from.
 |
| Our edit suite |
- A computer with two screens
- Headphones
- A MacBook
 |
| Screenshot from LiveType |
The software consisted of:
- Adobe Premiere Pro
- LiveType
The editing was all carried out on Premiere, with the exception of the titles which we created on LiveType, as it gave us a wide range of different fonts and effects to choose from.
Construction Post 22: Reflections on our Main Shoot Session
Overall, I think that our main shoot went fairly well, for example, the getting ready sequence looked good, costuming was much more appropriate and we stuck to the timings we had planned for each shot a lot better. There were still some issues though, in particular the red herring sequence.
We also noticed whilst editing that for one of stalker shot through the window, you could see one of the lights we were using to make the inside bright enough that the camera focused on that instead of the reflection in the window. This can be seen in the gif below.
In addition, we also noticed that we had some continuity errors in the kitchen section, for example lipstick on the glass before Tyra, our actress, had had a drink and her hand at the end of one shot not matching where it was at the start of the next.
The majority of these errors were very small and would be easy to fix in the back up shoot, just by making small adjustments, for example the errors at the table in the kitchen would be solved by shooting more of the whole action from either side.
Issues
These came mainly from the end red herring sequence which we had completely re-storyboarded after the test shoot showed it to be too confusing to build the anticipation we wanted. Although there was a huge improvement in it in the main shoot, we still had some trouble getting the distances right between the runner and the main character from shot to shot. The hand held running shot we had was also so shaky that it was jarring and meat that only a small section of it could be used.We also noticed whilst editing that for one of stalker shot through the window, you could see one of the lights we were using to make the inside bright enough that the camera focused on that instead of the reflection in the window. This can be seen in the gif below.
In addition, we also noticed that we had some continuity errors in the kitchen section, for example lipstick on the glass before Tyra, our actress, had had a drink and her hand at the end of one shot not matching where it was at the start of the next.
The majority of these errors were very small and would be easy to fix in the back up shoot, just by making small adjustments, for example the errors at the table in the kitchen would be solved by shooting more of the whole action from either side.
What went well
For the main shoot we worked a lot faster than we did in the test shoot because we already had an idea of what we needed to do and for the shots that used the lighting for example we didn't have to experiment with where to position them or how many we needed.
The getting ready shots went really well in the main shoot as we managed to recreate the ones that went really well in the test, for example the lipstick shot, and made the others pacier whilst ensuring that we lit the shots better so that Tyra's face could be seen more clearly.
I was also pleased with how the how we changed the stalker shot so that the camera tracked forward and the audience sees a gloved hand try to open the back door. This really added to the creepy atmosphere we wanted to create and helped build the tension we wanted that our TA research had told us we needed.
Below is a picture of all of our main shootbard pages. Please click to enlarge.
 |
| Our main shootboard pages |
Saturday 4 March 2017
Construction Post 21: Our Production Kit
Before we took out the equipment we would be using for our shoots, we were given demonstrations on how everything worked by the technician so that on the day we knew how to safely use all of the kit. We also had to sign an equipment release form stating that we had been taught how to handle the kit properly and that we took full responsibility for it during the shoot sessions.


 |
| Equipment release form |
 |
| Kit Checklist |
Equipment List
- Canon Legria HF G30 Camera

- Canon DM - 100 Directional Microphone and headphones

- Libec TH - 650 HD Tripod

In addition to this standard equipment, our group also used a Three point standard lighting system as we were shooting from the outside through windows to inside the room, which needed the inside to be lit very brightly to work.

Subscribe to:
Posts (Atom)